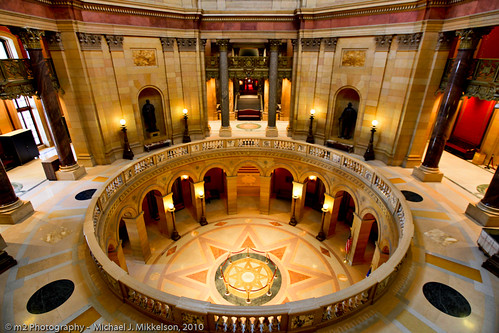
I was traveling in Minnesota, and walked to the State Capitol building. It's very ornate and has gorgeous marble and granite. I didn't have a tripod, but tried some quick bracketing for some HDR images. The colors in the building were fantastic, and I think the High Dynamic Range images turned out great.
Friday, February 26, 2010
Minnesota State Capitol Building HDR
Thursday, February 18, 2010
West Coast Panoramics
I was going through some pictures last night from our December 2009 trip to Seattle and Whistler, and forgot that I had captured a number of sequences for creating panoramics. I use a combination of Photoshop CS4 photomerge and Adobe Lightroom to process the pictures. Here are a few from the west coast trip.
Monday, February 8, 2010
Winter Ice Sports: Part II


Sunday, February 7, 2010
Winter Sailing: Ice Sports and the GoPro HD Hero
I went up to Madison, Wisconsin yesterday for the Culver's Camp Randall Hockey Classic, but had some time to kill before the hockey game started. I met a few friends down at the lake for some fun on the frozen ice. My friend Chris rides a custom rig that has 2 skis up on an angle attached to a board, which is then attached to a standard windsurfing sail. I clamped the GoPro HD Hero to the top of the mast, set it to capture 1080p video. Here are the results:
Click on image above to load video
I had also created 2 custom mounts for the HD Hero camera to use with a kiteboarding kite, which we also use on the snow with our snowboards. Basically, I used a combination of the helmet mount and a double loop to go around the middle strut on the kite. We went back and forth between capturing video and taking images, and got some great shots. Here are a few still images from the kite looking down at Lake Mendota and the kiter.


Even though this one isn't level, it's one of my favorites, as it shows the entire group out enjoying the wind. 3 snowkiters, and one ice windboarder in the same shot. Everyone in this image has worked at the UW Lifesaving station at one time.
Monday, February 1, 2010
How to Install SDM: (StereoData Maker)
StereoData Maker (SDM) is a CHDK variant that simplifies using your CHDK enabled Canon Powershot camera. If you are unsure what CHDK is, please visit the wiki here. I personally use SDM on my Canon G9, and will hopefully use it on my G11 and SD990 someday. Being able to easily run scripts for Kite Aerial Photography is my main focus for using SDM, which allows for custom intervelometer sessions. SDM is also very handy for timelapse photography. I thought I would post instructions on how to download and install SDM on a memory card that is larger than 4GB, which is the size limit if you use the normal CHDK hack.

- On my G9, I press the Shortcut/Direct Print button, this activates SDM(CHDK), and pressing Menu brings up the SDM menu.
- Here is an example of the Wind Watcher script.
- Make sure that the SDM_Boot partition is active before locking your card and putting it in the camera. You'll know that it's active, as windows should only see the 1.96 MB drive letter called SDM_Boot. If it says SDM_Data, you need to use the SteeroData Maker executable to swap partitions. You can only swap partitions if the card is unlocked. Here is an example of what the SDM Installer will look like if you are on the boot partition:

- Here is an example of what the SDM Installer will look like if you have the data partition active.

- In order to copy scripts into the SCRIPTS folder, you'll need to make sure that the Data partition is active, and the card is unlocked.
- Basically, in order to use the SD card on your PC, it needs to be unlocked. In order for the SD Card to work in your camera, it needs to be locked.


